


Traditional Art
Defining Alla Prima
In this tutorial we will explore the alla prima approach. So, what is "alla prima"? Alla prima is an Italian term meaning at first attempt. In other words it's a direct, wet on wet painting method, using one layer of paint, done in one session. If the scale allows it then the painting can be done before the paint starts to dry. If it's a large painting then you're forced to paint it in parts in the same manner. Although that would disqualify it from being an alla prima painting.
Now, this is one way to do it but it doesn't mean it's the only way or the best way to go with it.
But no matter our approach we have to be disciplined. So let's try some of that!
Supplies
Let's talk about art materials - we all love them. It's a good idea to invest in artist-quality materials. Poor quality supplies perform poorly. This gets in the way and makes your struggle harder. It's like getting good quality clothes: they don't wear fast. You don't need to worry though, because (depending on your needs) you don't actually need too many things to start painting.
Painting Surface
There are plenty of surfaces you can choose from: heavy paper, canvas, panels, masonite and hardboard. I personally work on panels and most of the time I cut my own from masonite which doesn't bend. You can mount cotton or linen on it as well.
For oil painting you need to prime the surface with gesso. Beside the practical reasons we need priming, another important reason behind it is that oil won't contact the material beneath and cause deterioration.
Here I have a little piece of board (12x17cm) with 3 layers of gesso.

Brushes
It's essential to have some really good quality painting brushes. You need good response from them.
I like to work with rounds, filberts and egberts. I seldom use flats but I do on architectural areas.
I won't use all of these, just a few. Prefer to work with bigger brushes. Also, don't use the same brushes to mix both shadows and lights.
Remember to clean your brushes after you're done and avoid leaving them with paint or mediums on overnight. Remove as much paint as possible from the brushes with the help of a rag or a paper towel. Then gently rub them on a soap bar and rinse in water, repeat thoroughly until no stain comes out.

Paint
Normally I work with a warm and cool palette which includes more pigments, but I limited it down to make it less overwhelming.
But for portrait & figure painting all that you really need is just the Zorn palette:
- White
- Yellow Ochre
- Red (Cadmium, Scarlet, Pyrrole e.t.c)
- Ivory Black (it's a cool black, add white and it will read as blue-grey next to the rest colors)
Master this palette and then add one color at a time so you know what each pigment offers you.
*This palette is really affortable even in artist's quality paint. Just choose Scarlet Red.
Keep in mind that I won't go into flesh color mixing formulas.The key is good observation. Skin tones are relative, it's a combination of local color, the nature of light and the nature of the area which it covers. So for example, instead of me saying "you should mix Burnt Sienna and Yellow Ochre" I'll say something like "a desaturated warm orange mixture" so you can comprehend the idea behind the mixing and not take as a literal example.

Solvents and Mediums
You'll need solvent and/or linseed oil to clean your brushes during painting and at the end of the session. As for mediums there are plenty you can choose from. You can prepare some if you want with 1 part linseed oil & 1 part turpentine which is a standard recipe. By all means do not use any non drying oil during painting.
I don't use any medium when I paint, only turpentine for the initial layer. Paint out of the tube works perfect for me.
The Laws of Light
It's a good idea to remember how light illuminates an object in order to avoid confusion when we refer to related terms, and also give a hand to the ones who just getting started.
Reference
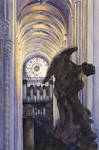
Here we have a wonderful reference by DanielleFiore . Lighting, historical costume making, immersive posture. I recommend you to head over her gallery and see for your own.
As you can see the lights and the shadows are pretty clear and that's what you want.
Painting heads is difficult on its own, you don't need to make it even harder and boring with unwise choices of lighting conditions. Besides, as representational artists we love to paint volume, and volume is one of the first things which makes a head look beautiful, not individual eyelashes.
Look how beautiful the light and the shadows are grouped in the image to the right. Squint at your reference, if the shadows and the lights group well then it will read well.


The Process
"Fall in love with boredom. Fall in love with repetition and practice. Fall in love with the process of what you do and let the results take care of themselves." -James Clear
This is the rough plan which I'll follow in painting this portrait

Drawing and Painting
Color Won't Save a Bad Drawing
If you are struggling with your drawing, I'm not going to say anything new to you.
♦ Work on your drawing.
(Now you need to transition from drawing to painting. Think of painting like drawing, but your tool is paint.
In order to apply the knowledge on drawing to painting successfully you need to make rigid babysteps.
Hurry up, bypass these stages and sooner or later you'll encounter basic problems which will be difficult to solve)
♦ Work on drawing with monochromatic paint (turps and Burnt/Raw Umber, rub out the canvas for your white).
♦ Add white to your pallete (later if you feel the need to deepen your shadows just add black)
♦ Paint with the Zorn pallete.
Master it, push the envelope. I always get back to limited palletes because they're such great teachers of a truth: color won't save a bad drawing.
In the following content I'll use GIF's to demonstrate the process. If GIF's confuse you then go ahead and open a new tab for Portait Painting in Oils - Sequence, as a reference to the process.

Drawing
Here I begin by scrubing a light stain of Burnt Sienna - with a big brush - over the entire surface in order to get rid of the white. It depends on what my goal is. Sometimes I prefer a more neutral mixture and sometimes I leave it white for more translucent results.
Picking a up a small sized round brush I start laying in the drawing.
First I block in the bigger shape of the head by deciding what’s the width and the height and placing those first. Make sure that you won’t run out of space. Then I continue placing the shape of the head while paying attention to the width of the cheeks, the jaw and chin. After that I place it on neck and shoulders.
I'm going for the shape of the hair.
I draw the crosshair, that is the brow line and a vertical splitter to help you to place the features accurately.
Then I’m placing the eye brows, notice where they begin, where they arch and where they fall.
After that I move and place the eyes on their eyesockets. Normally they are in the middle of the head but here we’re looking the model from a lower angle. So that line gets affected, especially the ears. Pay attention and don’t crowd them too close to the nose or too far from it.
Moving down towards the nose I note where it ends, and draw that in as well.
Then you split in half the remaining space from the bottom of the nose to the bottom of the chin, that is the bottom of the lower lip, most of the time. Draw that in, don’t forget about the ears as well.
Having the shape of the head and features I move on and draw the shape of the form and cast shadows as well during or towards the end of the process.

Shadow Side - Darkest Darks
According to the plan we saw earlier, first we'll establish the darks and then we will build up the forms towards the lights.
I like to start by having the head framed by the hair. So here I squint at my reference to mass together the values and compare them.
The darkest darks on my painting are certainly on the hair.
Her hair is a deep natural looking red, so I begin by mixing a dark reddish brown (Madder Deep + Olive Green). I push the mixture towards the red side.
When I paint hair, I like to use transparent colors as much as I can. I fancy the translucent quality they give me. Although it's hard to get good coverage with transparent colors. Opaque colors give rigid value passages.
Later on the process, if I notice that the darks aren't deep enough, I'll come back and reinforce them carefully with a clean and well loaded brush. Although the more I revisit areas the more I'm likely to kill the brushwork and the value. For this reason I make sure I get as dark as I can at first try and I avoid revisiting them.

Light Side - Halftones
Since her hair has a dark local value, the lights won’t be so bright. As you can see I massed in the rest of the hair - with the same transparent mixture - but thinner so it will appear lighter in value (transparent colors are darker when the concentration is greater, this is their “mass value”). With this understanding I'm picking up the highlights with the brush if I wish to.
My approach on painting hair is quite painterly because it depends heavily on mixing the right value and the proper brushwork. The brushwork will give the direction of the form. And just like previously, don’t revisit areas unless you have to, and that’s my advice on maintaining a fresh look on your painting. Sargent knows. He scraped it off if he wasn’t satisfied with it and tried again. So it’s better scraping off with the palette knife instead of trying to fix things by overworking an area.
You might noticed that I simplified the hair to a noticeable extent. I even extinguished a lot of the lights and manipulated it’s shape as well. With hair you can feel free to do so. When working from life, hair will move around a lot. So you too have to play around with it.
Also it’s a great tool for choices on design. Here I left it dark in the bottom corner because I don’t want the viewer’s eye to wander around the corners. Although researchs shown that you can’t really guide the eye much in such cases, because regardless it will go for the face and the hands. So there’s that.
With each brushstroke, you have to think of:
Primarly:
- Value
- Color temperature
- Direction of the form
- Edge (hard, soft, lost)
Secondly:
- Chroma
- Thick or thin
- Texture
All these become intuitive with time.

Shadow Side - Darkest Darks
I continue by gauzing which are the darkest areas on the face. These are mostly the occlusions, like the nostrils and the crevices between the lips and also the pupils. I decide from the start that, in temperature, I want the mixtures warmer on the shadow side and cooler on the light side.
So I lay a dark base for the iris with a brown mixture that leans on the green side (Madder Deep + Olive Green + a hint of Y.Ochre to make it more opaque) and then I apply on top the pupils so I have a clean shape with a black mixture (B.Sienna + Ultramarine).
I also paint the thickness of the upper eyelids that hide in the dark side with a deep red mixture (Madder Deep + Y.Ochre + a little Olive Green to reduce the chroma).
I continue with the darks of lower plane of the eyebrows (again, better make things more dark and light them up later than not dark enough).
I use again a cooler brown-ish mixture (Olive Gr. + Madder D. + Y. Ochre Pale).
Moving down, I mix a deep red for the lip crevices and the nostrils (Madder Deep + Scarlet Lake , I add Olive Green to the mixture for the nostrils to darken and neutralize it a bit), and continue with the upper lip and the bottom of the lower lip by adding a touch of Y.Ochre to the same mixture.
At this point I block in the cast shadow under the nose, the edges of the hair as it meets the face and shoulders. I also started to visit the core shadow on her left cheek (playing down the same earthy orange mixture for all of these).
Shadow Side - Core Shadows & Reflected Light
I move on to the shadow side on the face and lay in the core shadows on the eyesockets, down to the nose, a bit to the edges of the lips, the cheeks, jaw and chin.
I mixed a warm earthy orange on the red side for the bloodier areas (eyes, nose, lips, cheeks) and more to the yellow-green side for the rest of them (B.Sienna + Scarlet R. + Y.Ochre Pale + Olive Green). This is not a formula, life varies. I often see reddish temples, chins and neck areas for example.
As I move down to the neck I begin to paint the cast shadow there (darker mixture) and move towards the reflected light on the neck and the chin above. I notice that the reflected light is cooler on the neck (I lighten up the darks with light colors instead of white, I add tiny bits of it only if I have to for the shadows to avoid mud).
Then to the sternocleidomastoid muscle where it connects to the sternum, it creates a form shadow. It gets tricky down there but with a little anatomy study it’s not that hard to understand the subtleties on the connection of the forms.
Pay attention to the edge between the neck and the hair. I decided to make this transition softer there.
I noticed that I wanted deeper darks on the hair. I go right in and reinforce them and massed the ringlets so they stand out better as simple forms.
I dragged a couple of lost edges on the hair to the left. Then I lay a wash on her blouse with B.Sienna. I need a base for the blue later.
Light Side - Halftones
First and foremost I start off by mixing carefully the transitions between the core shadows and the light side.
It’s your darkest halftone. Don’t make it neither too dark nor too light.
Make sure it’s lighter than the lightest area on the shadow side. You don’t want the lights to compete the darks. Otherwise it will read “confusion” and nothing else.
Colorwise the mixtures for these transitions will be neutral because the planes there are facing away from the light.
At this stage I take some time to prepare a pile of a flesh tone mixture, in the value of the lights, not the highlights (White + Y.Ochre Pale + B.Sienna + Red Scarlet).
Around this pile I’ll make my adjustments:
For the neutral transitions I mix B.Sienna + Ulramarine close to the light pile. I add some to my light pile of the flesh mixture and neutralize it as much as needed for this purpose. Well placed neutrals will make your portrait look lifelike.
For the cheeks I added more P. Madder Deep (that's a bluish red) to make them cooler.
So I’m adjusting the mixture and making it warmer with yellow/red or cooler with blue/green (e.g. eyelids, jaw, neck areas).
I also worked the eyes as well. The “white” of the eyes will be the light flesh tone mixture with grey added to it. As it toutches the eyelids I transition the “white” with more red fleshtone.
Notice how dark is the white of the eyes in value. Also don’t forget that they’re spheres, render them as such.
I add more blue for the edges of the eyelids, closer to the eyelashes.
Light Side - Halftones to Lights
Continuing working on the halftones as the forms turning more towards the light.
This step basically is just getting right the gradations like always.
Remember the eggshape idea of the head.
Most of the time you'll find raise in the chroma between the halftones.
Adjusting the pile of the light flesh mixture as it goes lighter and cooler for me. I add a bit more Y.Ochre to avoid chalkiness in the lights, but not so much that it will make them warm. White alone will make the mixtures cooler, be aware of that. Lighten with light colors and darken with dark colors rather than using just black and white in that respect.
So I use slightly more yellow for the forehead, red for the middle of the head where there are more blood vessels closer to the skin and more green or blue as it goes down to the jaw and the neck away from the light.
I add Yellow Ochre to the B.Sienna + Ulramarine mixture and drag my brushstroke from the eyebrows to the skin to get a natural blend, keep them soft.
As I model the eyes more I add more white to the Fleshtone+Grey mixture to render the eyeballs and on top I model the color of the iris too.
On top of the eyeballs there are cast shadows from the eylids. The iris will be darker on top due to this and lighter on the bottom. Light goes through the cornea and hits the concave like surface and gives that effect. You’ll notice this on the eyes of sculptures. They’re modeled like that so it catches light the same way.
As I work on the nose I try not to lose the neutral edge on the tip where it transitions to shadow. Unless the model is drunk or has the flew, avoid overstating the redness of the nose. Always look at your model and of course, make your decisions.
Now the lips. Adding more red to my pile and while treating carefully the forms of the lips as they turn in and out (the lips become really saturated in the shadow area because light travels though them and diffuse, the same happens with the eyelids and the ears). For the lights I add more blue with white.
Now at the edges where the lip tissue becomes skin, mix on your palette the transition between the two and make the edges soft. Except if your model wears lipstick, then you’re on your own...

Light Side - Lights to Highlights
First place your lights, don’t make them pop out of place by raising the value too much. Then add the highlights on top of them. And again be carefull not to overstate them. It should read nice and smooth. I like to use thicker paint on the lights so I get some texture along the way.
On the highlights of the eyelids I add more blue, more on the bottom ones. Don’t forget that eyelids wrap the eyeballs. Make them turn in the same manner. You’ll notice that the highlights around the eyes are cooler too.
Moving down I model the forms of the nose carefully. The front plane of the nose is darker than the front plane of the face here so mix the right value. The highlight is not popping much either.
The structure of the cartilage there is not very hard to understand, just take time to study how the wings connect to the ball of the nose and the frustration will dissapear.
For the lips, like I mentioned previously, the highlights here are cooler. Instead of rendering every little line of highlight that I see I choose where I place one or two. Dime a dozen of them doesn’t seem pretty to me. But you’re free to make them as you like.
I mix the transition between the hair and the skin (a neutral one) so the hard edge dissapears.
Then I render the neck down to the sternum. It’s a tube and then planes facing away from the light, There are quite desaturated skin tones down there.
I play a little with lost edges on the hair, almost drybrushing, and picking out the highlights on it with a brush, since I want to keep it transparent and soft.
Finally, this is the moment for me to soften some edges. I choose where and why, if it’s needed. Avoid overblending, it will kill your painting. And if you want softness it’s better to do it at the end, when everything will be in place.
Epilogue
This is just one way to do it, but there are many others as well. However you choose to approach portrait painting, make sure it makes sense and avoid developing bad habbits.
If it seems overwhelming or you're really dissapointed with your efforts then please do not forget to tackle it a step at a time and reward yourself for the progress you make.
Keep classy, make tea and paint the life out of those heads!
Other articles by SombrePainter :
- Introduction to Gouache

